Showing posts with label marbling. Show all posts

Wednesday, April 16, 2014

U of M Men's Gymnastics

Last Thursday, Friday, and Saturday were the National Championships for NCAA Men's Gymnastics. (Michigan won as well as having the All-around winner!) They were held at the University of Michigan and my oldest sister is obsessed with gymnastics, so she came up from North Carolina. She, my parents, and I went to the Thursday night events and my other sister and her daughter joined us on Friday. We didn't end up going on Saturday.

I wanted to paint my nails Michigan colours and I decided to do a marbling. I was going to do other designs on my mom and oldest sister, but they didn't end up having time for me to paint their nails before.

Since the University of Michigan's colours are blue and yellow, I wanted to do a test marble to make sure that it didn't end up green. I took a piece of plastic from a baggie and I painted the blue and yellow that I was going to use as well as a white. This was to see what colour would look best as the base colour. Then I did a marbling on the water and put the plastic on top to take it up. The blue and yellow didn't create green when they were in the cup, but they did create green when they were used as the base colour. I decided that the white looked much better. (The white is on the upper left, blue on upper right, and yellow on lower right)


 So I painted my nails white and let that dry before doing the marble. Before I had the marbling on them, they reminded me of when I was in elementary school and people would paint white-out on their nails during class!


This was the last marbling that I did. I liked how it turned out a lot better than my other ones. Instead of putting the paints in like one big target, I decided to do a few smaller targets. The colours looked a lot better as they alternated better when mixed. The other way had bigger patches of blue and yellow.


I had a lot more issues with this marbling than I had last time. For some reason, the polish wasn't spreading as well and I could only get a couple nails at once instead of being able to do one hand at a time. For this reason, my thumb and pinkie got really messed up.


I wasn't too happy with how they turned out and I forgot to take a picture when they were cleaned up a little better as a result. I was originally going to redo them for Friday night, but I ended up not having time, so I just kept these for a few days.

Thursday, April 3, 2014

April Showers

I found another nail art challenge the other day that has them set up for each month with a new theme every week. This week is Rain/April Showers.

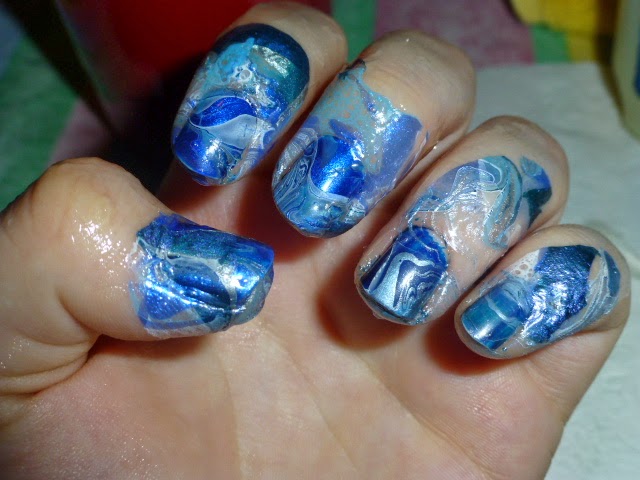
I decided that I wanted to do a blue water marble for the background of my nails so that it would look like storm clouds. I used various shades of blue, silver, and white. I then put one umbrella on each hand.


I used this small cheap blue nail polish for the base colour. It doesn't cover well and it takes a ridiculous amount of strokes to get even a bit of coverage. (My mom actually thought that it was already marbleized when I showed her it this morning.) Since I was going to do water marbling, though, I didn't care too much about it being streaky or having lots of clean up since I knew that it would only get worse. I painted this part last night, so most of the excess fell off by the morning.


I decided to use Vaseline on my fingers to keep the nail polish just on my nail and make clean-up a little easier. Last time I used Vaseline, I just put it on with my finger and it was a huge mess, just a different kind. This time I used a Q-tip to keep it where I wanted it instead of all over.


 This is what the marbling looked like when it was all done.

 The Vaseline made clean-up so easy! The excess nail polish is just like another layer by itself. I just used the side of a toothpick to wipe it off of my finger. I tried to capture the ease of cleaning with this picture.


 Then I drew in an umbrella on my finger. I was pretty happy with how the outline turned out, but then it got worse.

I tried to make it orange, but the orange nail polish was just running and making a mess. I decided to try to put red on it instead. That looked better, but it was still a mess from the orange. I also decided that the black handle was sort of hard to see, so I changed it to the brown that I just got about a week ago and haven't used yet.


 The polishes that I used for the umbrella and marbling. I used just the silvery-blue of the dual-polish.


EDIT: At work today, one girl tried to take off my nail polish saying that it was "just a sticker." She didn't believe that I could actually do marblizeing with nail polish!

Saturday, March 15, 2014

Get Lucky Nail Art Challenge Day 1: Shades of Green

I saw a St. Patrick's Day nail challenge a few days ago and I decided to take part. The first day was shades of green. I decided to try my hand at marbling again. I had tried it before but had a LOT of fails. I read about a technique called dry water marbling, where you do a similar thing, but instead of putting your nail in the water, you put a piece of plastic baggy, take it out, let it dry, and transfer it onto your nails. I started doing that last night because I couldn't sleep.  I learned some valuable lessons trying this manicure. It failed a little bit, but I've definitely improved and learned how to do it better next time. Here's my finished nails and then I'll show the process.

 First fill a cup with water. I learned this time that it needs to be purified water at room temperature. I've also learned that you can't use a styrofoam bowl because I used that last night and was wondering why it took so much water. When I emptied the water, I found that a few nail polish drops had gone to the bottom and corroted holes in it! Good thing I had a towel underneath it!


Once you have you have your cup with water, alternate nail polishes that you want to marble. In this case, I did different shades of green. The one that looks blue is actually a blue/green but looks blue next to the others. I didn't use it in my end up using it for my final nails.

Then swirl the colours with a toothpick. Be careful to not lift up the toothpick too much as that results in it collecting nail polish and getting messy and clumpy when you put it back.


These are some finished ones. I decided to use black as my first colour because it made the other colours pop. They were too dull without the black.

Then cut the correct part that you want to add to your nail. Make sure that it is the right size. Mine were big enough, but I had other problems.

 Here's the first finger I did, my right thumb. It actually looked good and I was really optimistic.

My index finger didn't turn out too well as there wasn't much of the bright green. Here's the process on my middle finger.

 It looked pretty good, too. However, the other nails all seemed to fail. I decided to just try doing a regular water marble on them since it seemed like I was having more luck with the marbling that I did last time.

Here's my nails after dipping them. I decided to dip all of my nails at once in order to waste less nail polish. They were hard to clean and in retrospect, I should have gone to get that Vaseline out of the bathroom. I was just too lazy, but it really does work like magic, as I found out the first time that I tried to marble.

Here's another picture of the final product. They're messier than usual, but I wanted to make sure that I finished this post before heading off to the U of Michigan hockey game with my dad.

EDIT: I forgot to add the polishes I used...