Saturday, August 30, 2014

Nerd with Nails Salon is open for business!

Well, that title is kind of a joke. It was the first time that I did someone's nails besides my own or my mom's. I pretty sure to be a salon I would need to have people pay me and need some kind of license.

My friend from graduate school loves my nail art and when I was in America she said that I had to do her nails when I came back to Australia. We had planned to do it before my wedding, but then we didn't have time and it didn't end up happening until yesterday.

She had wanted to do a zebra print accent nail, which I did about a month ago based off of her design when I needed to do animal print for the OMD2 nail challenge. I showed her my nail polish collection when she got here and she was overwhelmed with all the choices. Eventually she changed her mind about the zebra print decided that she wanted to do something based off of a purse that she has. It is a teal colour and has cow print.

The colours that she chose were Lily White from Ulta3, my unknown black, and Amazon-Amazoff from OPI. She wanted white nails with an accent of the cow print.


I drew the cow print on the accent nails by sort of dotting with a brush. She wanted to add the bit of colour by having me outline one spot on each hand, which I did with my smallest dotting tool.


Wednesday, August 27, 2014

Harry Potter and the Hogwarts Manicure

Sadly I had to do a lot of scrubbing with the dishes last night and my manicure from he picks my polish was completely ruined. I'm not talking about just chipped. I mean that some of my nails had more nail polish that came off than was left on the nail. Although I did like my manicure yesterday, I needed to redo it today. I couldn't stand to have them that worn off!

I had a hard time finding inspiration, but it came to me when I picked out my clothes to wear. I decided to wear my shirt from the Spartan Quidditch Bonanza (or SQuiB) which was an intercollegiate muggle quidditch tournament that I went to during college. I was a co-founder of the Hope College quidditch team and we were invited to participate. We got fourth place. Anyway, it inspired me to do Harry Potter themed nails.

These are the polishes that I used. Bonna Blue by Fresh Paint, Lily White by ulta3, Dangerous by Sephora (Singapore), Gold Fusion by China Glaze magnetix, Con-fused? by China Glaze magnetix, Push and Shove by OPI, an unnamed blue by Chi Chi magnetic, Force by L.A. Colors, Belsize Park by Nails Inc, and my unknown black by Wet N Wild.


I started by painting my finger nails each a colour of one of the Hogwarts houses. I painted my left thumb white for the logo and my right thumb Bonna Blue to represent the sky in Quidditch. I then put tape on my right fingers to give them a checkerboard pattern to add in the houses' secondary colour. I then painted over them.


While I waited for them to dry so that I could peal off the tape, I painted the snitch on my thumb. I did this by using the brush from the gold bottle to make a drop. I used a dotting tool a bit to thin out the drop and make it a little bigger. I also used a dotting tool and the Push and Shove to make the wings.


 I took off the tape and voila! (Although I did have to do some touch ups in addition to cleaning up.)


The left hand was quite a bit more complicated. I decided to look at the house crests from Pottermore. I just used one small brush to make the different animals. The Slytherin snake and Ravenclaw eagle were both really easy to do and pretty straight forward.

For the Gryffindor lion, I started with the gold. Then I realised that I needed to do the mane. I started using a mixture of the gold and Force, which I used as a bronze. That wasn't different enough to show up well, so I just did Force. That still didn't show up well, so I added some streaks of black. I also added black dots for the nose, eye, and mouth, which I'm not too happy about.

The Hufflepuff badger wasn't too hard compared to the lion and I actually really like it, despite my dislike of Hufflepuff since I'm a Slytherin. I first made an outline of the badger using black. Then I needed to add a bit of white. I didn't want to be left with big bright white marks, so I didn't clean the brush between these steps. Instead, I wiped it off a bit and dipped it in the white and wiped more excess off. This gave me a gray varying amounts of white that I am really pleased with. Who would have thought that Hufflepuff would be my favourite finger!


Tuesday, August 26, 2014

He picks my polish

I saw a prompt on Pinterest called "He picks my polish" where you have a guy pick 1-3 polishes and then you make a manicure and post it with the hashtag #hepicksmypolish. (Apparently the collection was actually a few days ago, but oh well. They also do it every month here.)


I decided it would be fun, so I had my husband, Rohan, pick some polishes for me last night. He picked Spun Sugar by Revlon parfumerie, Frostbite by China Glaze, and Candid Cameron by Nicole by OPI.


He was too kind and knows my favourite colours too well because his choices matched the ring that I was wearing almost perfectly. I was trying to figure out what to do and I saw my ring and was inspired. I decided to paint my nails the Spun Sugar with an accent nail to look like the shell part of my ring. That was a fail because there wasn't enough of a difference between the blue and green to correctly caption it and so it just looked messy. I decided to scrap that manicure and looked up some inspiration on my pinterest page. I decided to retry the cling wrap technique.


I repainted my accent nails the Spun Sugar and then tried a new way to do the cling wrap technique because I had problems with it last time I tried to do it. Last time I followed the directions I found online that said to paint another colour on top of your base colour and then use the cling wrap to remove spots. I found that that technique just ended up taking a bunch of my base colour off as well. So instead, I decided to paint onto the cling wrap and use that to apply the colour. It's a backwards approach.


I started with some of the Candid Cameron and moved on to the Frostbite. It was pretty messy, but not as hard as water marbling to clean off of your nails.


I really liked the final product, although it was really hard for me to get a good picture because I kept getting really bad shine marks. I added a couple of each hand to better show the colours. Also I tried to apply top coat but that just meant that I got my ring finger stuck under my middle finger because I have a problem keeping them apart while drying. This meant that I had to try to use cling wrap to try to get some colour back because it took it all off, including the Spun Sugar underneath. I fixed it pretty well, though.


Wednesday, August 20, 2014

The Doctor is in!

I decided to go with a Doctor Who theme because Sunday is when the new series comes out. It's pretty exciting stuff because there's a new Doctor. I was looking for some inspiration online and saw that some people had done galaxy nails for Doctor Who. I chose to have my accent nails be the TARDIS on one side and a dalek on the other. I ended up using a lot of different nail polishes in my design.

From left to right: Force by LA Colors, Gold Fusion by China Glaze magnetix, my unknown black, Frostbite by China Glaze, Lily White by Ulta3, Candid Cameron by Nicole by OPI, a purple-ish colour by Chi Chi magnetic, Mistletoe by Revlon, and Radiant Violet by Three Beauties.


I started with the Radiant Violet on the nails that would be galaxy, which is the same as the galaxy nails that I did before. I chose to do the dalek on my right hand, so I used Force for the background colour on my accent nail.


I did Frostbite for the TARDIS on my left hand.


I didn't take pictures throughout the process of making my galaxy nails. Basically I used a sponge and alternated between the five polishes on the right of the picture above until I thought that it looked nice. After I finished painting the TARDIS and dalek, I added a top coat which made the galaxy look really pop because it brought out the shimmers. For the TARDIS, I painted the black line with a brush and then used a small dotting tool for the letters. They ended up being a bit like white blogs, so I used the dotting tool again with black to make them look more like letters. I mixed the Frostbite and black together to get the darker blue for the line in the door and the window crossbars.


For the dalek, I used a small brush to do the black lines and then a dotting tool for the black dot up top. A blue light shines through the appendage represented by the black dot, so I mixed some of the Lily White and Frostbite to dot. The dots at the bottom are Gold Fusion.

Wednesday, August 13, 2014

Ikat

I think this is the last of the OMD2 nail prompts that I wanted to do but ran out of time. I didn't know what ikat was when I first read the prompts, so I did a brief google search then. I did a more thorough one today to find my inspiration. I liked the look of this one from this page.


I then picked out my colours. I'm not sure why the middle looks red, but it's Raspberry Rapture from Revlon and is scented. The green is Glowstick.

After I did my base coat and painted my nails white, I grabbed a small brush and did the green part. I didn't like how my first brush worked because there were a few bristles that went astray and were leaving marks I didn't want. I was surprised because the first brush I tried to use is from Sephora and cost quite a bit and the second one was part of a really cheap pack from Born Pretty. I was also glad that the ikat pattern left meant that it was alright to have inconsistent green lines.


The next step was to fill in the pink. I like how they turned out except for my left thumb. I really should have done a different part of the pattern so that it had more pink, but live and learn!


Friday, August 8, 2014

Fashion inspired

One of the prompts for OMD2 that I was not able to do in time was fashion inspired. I decided to go with a purse that I got from Lily Ryan at an art festival that took place during Tulip Time when I was there with my family.

The polishes that I used were Low Tide from Spa Ritual and Lily White from ulta3. I tried to paint the white white a tiny brush but was having difficulties with the detail using my brush and switched to my smallest dotting tool.


Thursday, August 7, 2014

The importance of a good base coat

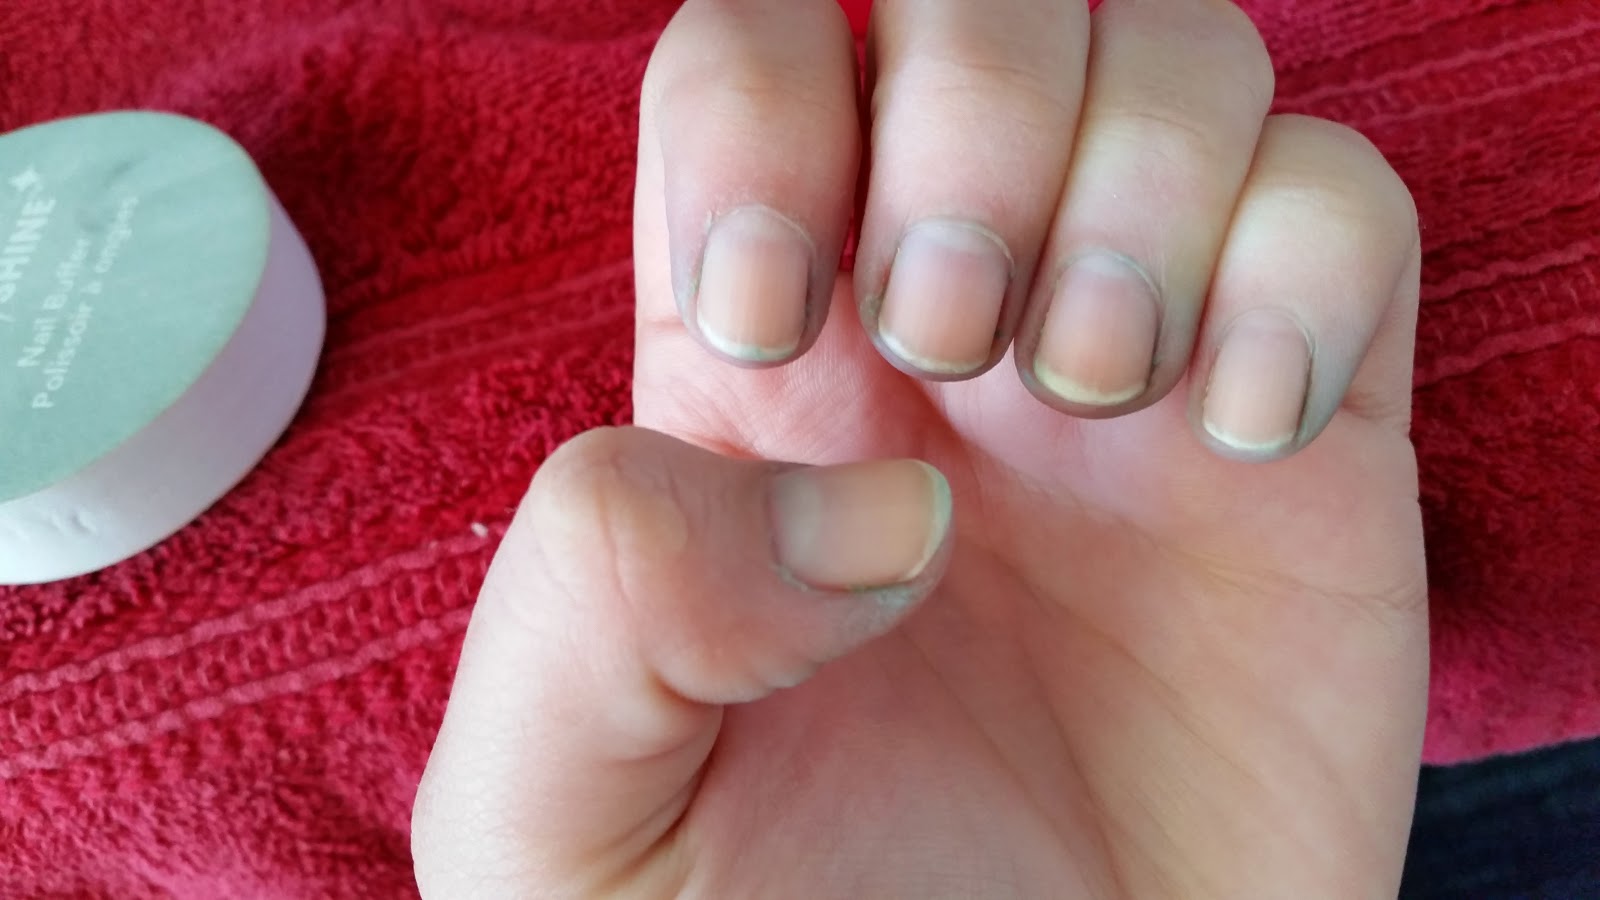
I didn't use a base coat when I first started doing my nails because I didn't know why I needed to use one and I didn't have one. Then I was doing my nails at least once a week and they turned yellow and stained. I have been using the base coat from Sephora's Formula X ever since. But yesterday I was in a hurry to paint my nails with something since I was going out to see friends and I completely forgot a base coat. Unfortunately it was Amazon...Amazoff from OPI's Brazil collection, which is a deep teal colour, so my nails and fingers got pretty stained. This is my nails after nail polish remover, non-acetone and acetone, were used until nothing more came off.


I looked up some things to do on google and they suggest lemon juice and salt for stubborn stains. I added some lemon juice and salt to warm/hot water and soaked. Then I buffed them a bit. The skin right around my nails is still pretty stained, but they look a lot better. I made sure to use my base coat when I painted my nails again today!


Fruit

I wasn't able to finish all of the prompts for OMD2 in time for the end of the competition because of that whole spending time with family, getting married, and honeymoon thing. But that's not going to stop me from doing the prompts that I had ideas for!

July 24th had fruit as the prompt. I wanted to do slices of oranges on my nails, so that's what I did today. It helps that I'm wearing a bright orange shirt today, too!

The polishes that I used are Jail Bait, Belsize Park, and Lily white, respectively.


I started by painting my nails with Jail Bait. I thought that the orange was just crappy and liquidy because of the brand but now I'm thinking that it's actually a jelly. It took a few coats to get it mostly opaque. I didn't mind that I still had VNL because of the overall design. I then started by art by making a smallish smudgy dot in the moons of my nails and had white lines radiating from it to represent the white stuff that separates orange pieces.

The next step was to create the white part of the peel. I wasn't too concerned if it was a bit transparent because of how an orange looks.


The peel of an orange is slightly more yellow than the inside, especially natural oranges and not the painted ones in most grocery stores, so I added some yellow to my orange. Then I realised that it was too much of a difference and I added more orange. It ended up being a bit lighter from the yellow, but similar enough that it didn't look too strange.


I thought that was going to be the end of the manicure, but then I thought that the white was too big and too much of a contrast. I decided that I would try making it look less bright white by painting my orange on top since that isn't opaque and you'd be able to still see the white. I ended up liking that a lot better, although if I did this mani again I would probably just add some orange to the white when I first painted it instead of as an afterthought.